_edited.png)
How to Capture Cinematic Drone Footage in Australia and Make Your Travel Videos Stand Out
- May 2
- 4 min read

How to Capture Cinematic Drone Footage in Australia and Make Your Travel Videos Stand Out
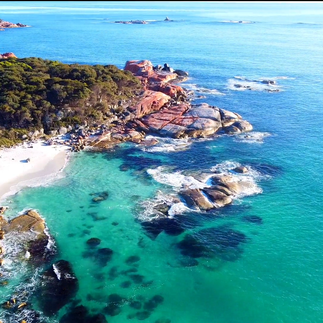
There’s something powerful about a well-shot drone sequence — the kind that instantly pulls you into a destination and makes you feel like you’re already there. Across our Wander Explore Discover travels, aerial footage has become one of the most important tools for storytelling, helping us showcase Australia’s coastlines, country towns, and wide-open spaces in a way that ground footage simply can’t. If you’re looking to create cinematic drone footage — not just random clips — here’s how to do it.


Start With a Story - Not Just Scenery
It’s tempting to launch your drone and start flying straight away, but the best footage always begins with a plan.
Think about:
What story are you telling about this location?
What do you want your viewer to feel?
How can your drone shot introduce or enhance the scene?
For us, drone footage often sets the tone — a slow reveal of a coastal town, a sweeping pass over a jetty, or a pull-back shot showing just how remote a place really is.
Master the Art of Smooth Movement
If there’s one thing that separates amateur footage from cinematic shots, it’s this: smoothness.
Use gentle, slow stick movements
Avoid sudden direction changes
Let the landscape unfold naturally
A slow, steady reveal will always look more professional than fast, jerky motion.
Use Classic Cinematic Drone Shots
You don’t need complicated flying skills — just a few reliable techniques.
The Reveal Shot - Start low behind an object (like trees or dunes), then slowly rise to reveal the landscape.
The Push-In - Fly slowly toward your subject to create anticipation and focus.
The Pull-Back - Move backwards and upwards to show scale — perfect for beaches, cliffs, and open roads.
The Orbit - Circle around a subject, such as a jetty, lighthouse, or rock formation, for a dynamic perspective.
These are the backbone of great travel footage — simple, effective, and visually engaging.


Fly at the Right Time of Day
Lighting can completely change your footage.
Golden Hour is Perfect for soft, warm light, long shadows for depth and richer colours.
Midday is challenging as you get harsh light, flat-looking landscapes and lots of glare.
Early mornings and late afternoons consistently deliver the best results — and often calmer wind conditions too.
Add Depth to Your Shots
Flat footage feels… well, flat, and it is pretty boring. To create depth:
Fly past foreground elements (trees, rocks, fences)
Layer your shot with near, mid, and far elements
Use leading lines like roads, jetties, or coastlines
This gives your footage that immersive, cinematic feel.
Keep Your Camera Settings Consistent
You don’t need to get overly technical, but a few basics go a long way:
Shoot in higher resolution (4K if available)
Keep ISO as low as possible
Lock your white balance
Match shutter speed to frame rate for natural motion
Consistency makes editing much easier later.


Fly Smart and Stay Safe
In Australia, drone rules are set by the Civil Aviation Safety Authority (CASA), and following them is essential.
Key Rules to Remember
Stay below 120 metres
Keep your drone in sight
Stay at least 30 metres from people
Don’t fly over crowds
Stay clear of airports
Watch for birds (especially near the coast)
Avoid strong winds
Keep an eye on battery levels
Be cautious flying over water
Safe flying = stress-free filming.
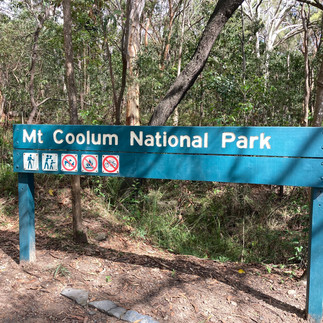
Respect Nature and the Places You Visit
Some of the most beautiful drone locations are also the most fragile.
Avoid disturbing wildlife
Respect people’s privacy
Follow local signage and restrictions
Check the rules in National Parks - each state is different
Responsible flying helps protect access for everyone.
Plan Your Shots Like a Creator
Instead of collecting random clips, think about how your footage fits together.
For example:
Opening shot → wide aerial reveal
Mid shots → closer movement or tracking
Closing shot → pull-away or sunset scene
This approach makes your final video feel intentional and professional.
Final Thoughts
Capturing cinematic drone footage isn’t about having the most expensive gear — it’s about how you fly, when you fly, and how you tell the story. With a bit of planning, smooth movements, and the right light, you can transform your travel content into something truly memorable — the kind of footage that makes people stop scrolling and start dreaming about their next adventure.


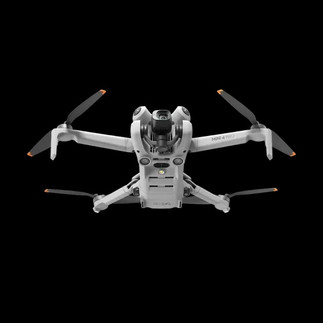
The Drone We Use for Our Travel Videos
For our Wander Explore Discover content, we use the DJI Mini 4 Pro — a compact, travel-friendly drone that makes capturing cinematic footage incredibly easy, even on the road.
It’s lightweight, powerful, and packed with features like 4K video, advanced tracking, and obstacle sensing — all of which help you focus more on creativity and less on flying stress.
👉 If you’re ready to start capturing your own cinematic aerial footage, Click Here to check out the DJI Mini 4 Pro.
Affiliate disclosure: Links in this article are affiliate links, which means we may earn a small commission at no extra cost to you if you make a purchase. We only recommend products we personally use and trust to help make motorhome travel more comfortable and enjoyable.


Comments